|
 |
Once you have settled on the proper site for
your pond, it is time to begin excavation.
|

 Miss Dig
- Before you begin to
excavate the soil in your backyard or anywhere else, be sure to give
your local utility company a call. Most of them have a program such as
"Miss Dig" in which representatives from the utilities will
visit your property and place flags over the location of underground
cables, wires, pipes and conduits. Miss Dig
- Before you begin to
excavate the soil in your backyard or anywhere else, be sure to give
your local utility company a call. Most of them have a program such as
"Miss Dig" in which representatives from the utilities will
visit your property and place flags over the location of underground
cables, wires, pipes and conduits.
It is never pleasant and may be very dangerous to stick your shovel
into a natural gas pipeline. There is no charge for the service so there
is no reason not to give them a call.
|
 Options for
Digging Options for
Digging |
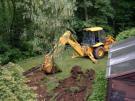
1. By Machine -
Depending on the size
and location of your backyard pond, you might be able to use power
machinery to excavate the hole. Small backhoes and bobcat diggers can do
a quick job especially for larger ponds. Some of these tools are now
available at local rental companies. can do
a quick job especially for larger ponds. Some of these tools are now
available at local rental companies.
The downside is that power tools often take either some learning time
for a new operator or must be operated by a professional. This can add
significantly to the cost of the project. On the other hand, a power
digger in the hands of an inexperienced operator could result in serious
damage to nearby trees, sidewalks, lawns, houses and the family dog.
|
2. By Hand - There can be a lot of
satisfaction in doing a job yourself. There can also be a lot of
calluses and sore backs involved. Depending on the size of your pond,
hand digging is a real possibility. It will save money and give you
control over how the hole is dug. The holes for the ponds in the
pictures below were all dug by hand in a single weekend. a lot of
calluses and sore backs involved. Depending on the size of your pond,
hand digging is a real possibility. It will save money and give you
control over how the hole is dug. The holes for the ponds in the
pictures below were all dug by hand in a single weekend.
|
 Pond
Depth Pond
Depth |
Generally, the depth of your pond will be dependent on whether you
decide to have fish. If you are just having a reflection pool or will
be growing a few plants, 12 inches of water may be all you need.
 Goldfish and their
relatives need about 18 inches of water depth if
you are going to over-winter them in the pond. This depth will also
provide enough water volume to moderate the fluctuations in water
temperature that will occur more rapidly in shallower ponds. Goldfish and their
relatives need about 18 inches of water depth if
you are going to over-winter them in the pond. This depth will also
provide enough water volume to moderate the fluctuations in water
temperature that will occur more rapidly in shallower ponds.
Koi need more depth than goldfish. They are capable of becoming
quite large and need room to maneuver and grow. Most koi enthusiasts
feel that you need at least 2 feet in depth and 3 or 4 feet would be
even better.
|
 Local Ordinances:
Before you
start digging, be sure to check with your local building inspector.
You may need a permit for the construction of a pond. Also, different
jurisdictions have differing requirements for backyard ponds. Some
will have a requirement that your pond be treated the same as a
swimming pool if it is more than a certain depth. If this is the case,
you may be required to fence in the area to prevent small children
from wandering onto your property and falling in your pond. Local Ordinances:
Before you
start digging, be sure to check with your local building inspector.
You may need a permit for the construction of a pond. Also, different
jurisdictions have differing requirements for backyard ponds. Some
will have a requirement that your pond be treated the same as a
swimming pool if it is more than a certain depth. If this is the case,
you may be required to fence in the area to prevent small children
from wandering onto your property and falling in your pond.
|
  Level
- It is very important that the top of the pond be level on all
sides. If one area is lower than another, guess where the water will
run. Level
- It is very important that the top of the pond be level on all
sides. If one area is lower than another, guess where the water will
run.
|
  Stones
- As you are digging your pond, be sure to remove all stones, roots and
other debris from the hole. Even the smallest, smoothest stone may lead
to a future puncture in a rubber liner. Remember that the liner will be
pushed against the sides of the hole under a lot of pressure once it is
filled with water. The liners are tough but, over time, they may wear
through and spring a leak if pressed against a solid, irregular shaped
object. Stones
- As you are digging your pond, be sure to remove all stones, roots and
other debris from the hole. Even the smallest, smoothest stone may lead
to a future puncture in a rubber liner. Remember that the liner will be
pushed against the sides of the hole under a lot of pressure once it is
filled with water. The liners are tough but, over time, they may wear
through and spring a leak if pressed against a solid, irregular shaped
object.
|
 Digging
Layers - Most ponds are excavated with shelves at different depths.
It Digging
Layers - Most ponds are excavated with shelves at different depths.
It starts with a small 6 by 6 inch shelf that will serve as the top edge
of the pond. By laying the liner over this shelf and covering it with
stone, the pond depth may lower by 6 inches without exposing any of the
liner to the sun. Remember that ultraviolet light is the enemy of these
liners. It is what causes them to become brittle and crack open over the
years. starts with a small 6 by 6 inch shelf that will serve as the top edge
of the pond. By laying the liner over this shelf and covering it with
stone, the pond depth may lower by 6 inches without exposing any of the
liner to the sun. Remember that ultraviolet light is the enemy of these
liners. It is what causes them to become brittle and crack open over the
years.
|
 Once
the first layer is completed, mark an area about 12 inches in from the
side. Now dig down 12 inches in depth and this will be the shelf for
your plants. It should tilt just a little toward the side wall so that
plant containers will be less likely to slide off and into the center of
the pond. Once
the first layer is completed, mark an area about 12 inches in from the
side. Now dig down 12 inches in depth and this will be the shelf for
your plants. It should tilt just a little toward the side wall so that
plant containers will be less likely to slide off and into the center of
the pond.
|
 |
The ponds on the left
show the top 6 inch shelf and then down 12 inches to a twelve
inch shelf with a depth of 3 feet at the center of the pond. The
top photo shows a small water fall of 3 steps coming down from a
small pond up stream. The lower picture shows the opening of the
skimmer unit which will determine the ultimate water depth in
the lower pond. |
 |
|
|
|


